
It must be admitted that data is priceless. Your iPhone is a mobile data center of your personal info, media files, and office documents. Backup may be the most efficient way in case you delete data mistakenly or you lost your iPhone. One of the lessons I learned from my iPhone is, never to update your phone without a backup. Time doesn’t go back. But with backups, you have the ability to restore your data.
In this article, we are going to introduce four different ways to backup iPhone 12 data, no matter you have a computer or not. Let’s figure it out now.
- Backup iPhone 12 via iCloud
- Backup iPhone 12 via Google Drive
- Backup iPhone 12 via iTunes
- Backup iPhone 12 via AnyTrans
Table of Contents
1. Backup iPhone 12 via iCloud
If you are a heavy user of the iPhone, to a certain extent you must have already heard about or used iCloud. You can work with iPhone’s built-in iCloud settings, to sync and back up your essential data, such as calendar, contacts, photo library, accounts, documents, health data. Follow the steps below to enable iCloud Backup function:
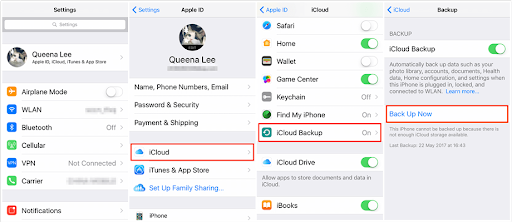
- Open the “Settings” application on your iPhone home screen;
- Tap your Apple ID column;
- Choose “iCloud”;
- Select “iCloud Backup”;
- Turn on iCloud Backup if it is not in an activated status;
- Tap “Back Up Now”. There you go.
Pros:
- Automatic silent backup. After turning on iCloud Backup, it will automatically backup your data in the background whenever your iPhone is screen-off, plug-in, or WLAN connection.
Cons:
- Require a Wi-Fi network. The prerequisite of backing up your iPhone via iCloud is, you must connect to WLAN first. Otherwise, it won’t start the backup process because iCloud is a cloud service.
- Unavailable to view backups. Although you can through your iCloud storage files, unfortunately, you couldn’t get access to your iCloud Backup content.
2. Backup iPhone 12 via Google Drive

Google Drive is an alternative to iCloud Drive, also a cloud storage service. You can also choose other cloud storage applications, no matter OneDrive, Dropbox, or any other providers. Follow operation steps below to backup with Google Drive.
- Go to the “App Store”. Download and install Google Drive;
- Open the app after installation. Tap the hamburger menu on the top justify;
- Tap Settings > Backup on the top screen;
- Then tap Start backup. Done!
Pros:
- Free to use. “Don’t be evil” Google also provides this backup function for free to iOS users. You don’t need to pay a penny for it.
Cons:
- Limited data types. Google Drive would be a perfect backup option for Android phones, however, iOS maybe not. At present, you can only back up photos, contacts, and calendar with Google Drive on the iPhone or iPad.
- Wi-Fi connection required. No matter which cloud storage services you choose, a Wi-Fi network is needed.
3. Backup iPhone 12 via iTunes
Not only playing the role of a media library, but iTunes is also one of the most common methods to backup your Apple devices, no matter an iPhone, iPad, or an iPod touch. iTunes only works on PC and Mac, it can help you create an iPhone backup of all your essential data and store it on your computer disk. Steps to backup with iTunes:
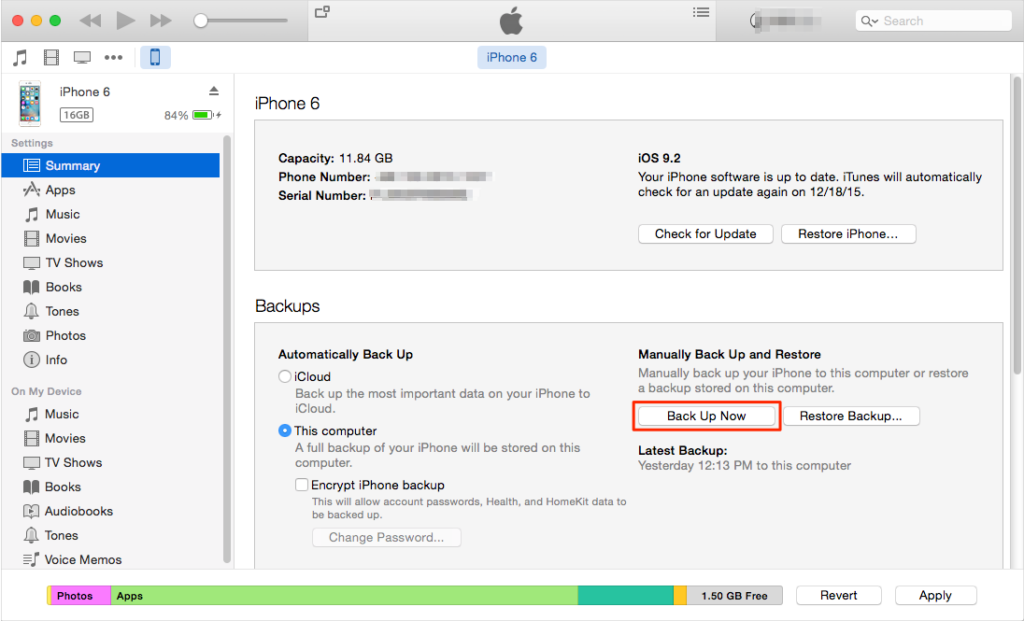
- Download and install iTunes for your computer (There’s no iTunes app for For macOS Catalina and above, but you can use “Finder”);
- Connect your iPhone 12 to your computer through a USB cable.
- Open the iTunes desktop app. Click “iPhone 12” in the top left, and choose the “Summary” column.
- Click the “Back Up Now” button.
Pros:
- With encrypt iPhone backup option. One of the great features of iTunes backup is, it allows users to input a password to encrypt their personal data.
Cons:
- Only full-backup is available. Every time you backup on iTunes, it will backup all your data and content. So, it would take up too much storage space on your computer hard disk.
4. Backup iPhone 12 via AnyTrans
AnyTrans is a professional iPhone manager, which enables users to manage, transfer, and backup their iPhone data in just one place. Follow the steps below to backup your iPhone 12 data with AnyTrans:
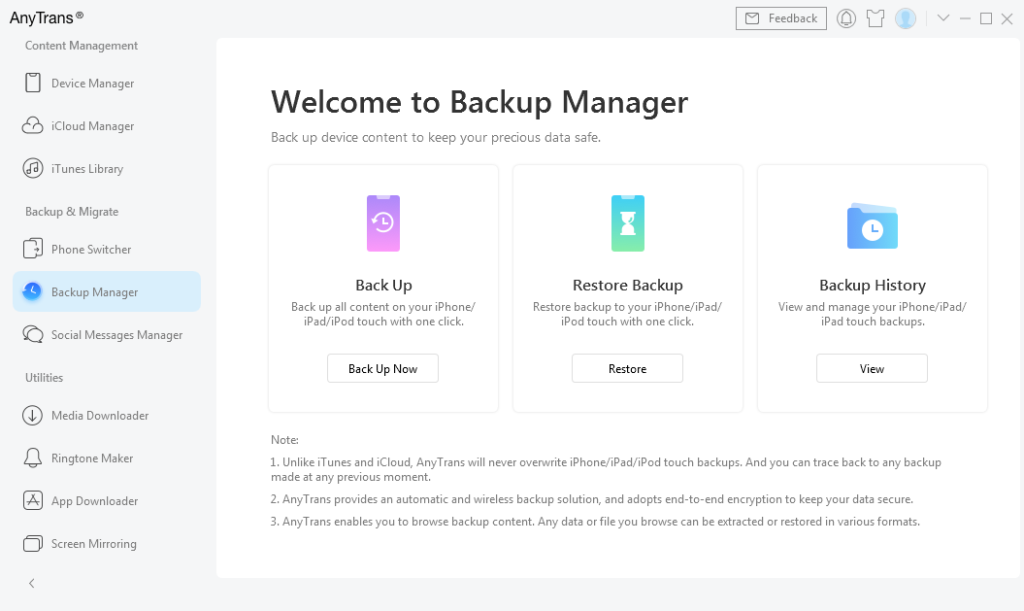
- Download and install the AnyTrans desktop application.
- Connect your iPhone 12 to the computer via a USB cable and open AnyTrans.
- Click “Backup Manager” on the left panel.
- Then click the “Back Up Now” button on the right panel.
Pros:
- Support automatic and incremental backup. With AnyTrans, users can only back up the new data after the first-time full back up. Better still, AnyTrans can automatically backup your device data once your iPhone and computer are under the same Wi-Fi. Of course, you can schedule backup timely.
- Available to view your backups. You can select any saving paths for your backup on the computer and you can also look through any backed-up content.
Cons:
- Creat backup and preview backup are totally free. But if you want to restore your backup, you’d better pay for the premium version.
Verdict
Backup your iPhone periodically is a good habit to prevent data loss or device stolen. The above options provide you potential solutions to backup your iPhone data. If you have a stable Wi-Fi network and only a few data to backup, then iCloud and Google Drive would be enough for your demands. While you have a computer and too much data to backup, then iTunes would be a great option. Otherwise, AnyTrans would be ideal for you if you need an all-in-one backup manager.